

How To Create A Stencil From A Photo
- Step 1: Choose Input Image
- Step 2: Settings Browser
- Step 3: Manual Settings
- Step 4: Stencil Creation
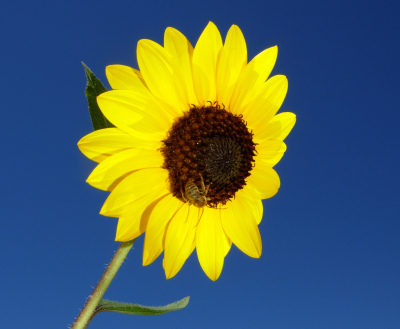
The interface on this website can support you to generate a multi-layer stencil from an input image. A stencil is essentially a cut-out template that can be used to paint with color onto a surface. The stencil material acts as a binary mask that decides if the color reaches the surface or not. Multi-layer stencils are multiple such stencils applied on top of each other with a fixed ordering, such that each layer contributes a certain color to the result. To create a stencil, follow the provided stepwise interface. In this first step you can either select an image or upload your own by clicking on the "Create New Stencil" button. Your uploaded image file can have JPG or PNG format and must be smaller than 2 MB.
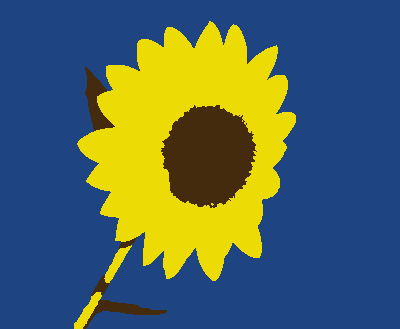
Here you see several randomly generated previews for your stencil. You can browse the choices with the slider bar. Click on the topmost preview image to make it your active choice. The active choice can be further refined in the next steps. If you need more choices, click on the "Create More Choices" button.
In this step, you can manually change the parameters for the stencil generation. Move the mouse over the parameters to receive a tool tip. The most important parameters are the number of stencil layers and the colors that are used for the different layers. To generate a suitable color scheme, you can select a color scheme generator from below (e.g. "Monochromatic"). Afterwards, left click on the color wheel and drag the mouse to select your colors or use the HSV slider interface. You can also try different filters and settings for the contrast enhancement. Click on the "Apply Changes" button to generate a preview result with the current setting. Once you are satisfied with the preview result, you can create the final stencils by clicking on the "Next Step" button.
init
Hue (RYB):
Saturation:
Value:
Original image opacity:
You can draw over the stencil preview by using the paint brush.
Correction brush strength:
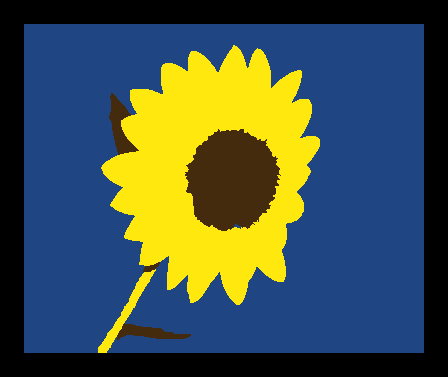
Here you will see the generated stencils for your chosen image. The individual stencil layers are displayed on the right. On the left, the final output image is shown, which is the composite of the individual layers. If you are not satisfied, you can go back to step 3 and make modifications to the manual settings. Or you can change some setting that control the stencil creation process by clicking the " Advanced Options" button. If you are satisfied with the result, you can download all stencil layers as a zip-file.

The interface below allows to manually change advanced parameters of the stencil generation process. Move the mouse over the elements to receive a tool tip. Once finished, click on the "Create Stencils" button.
Physical Stability Check:
Physical Stability Strength ():
Physical Stability Threshold ():
The stencil color is
. All other colors should be cut away.
You can download the stencils by " Right click " → " Save Image as... ". Alternatively, you can download a zip-file with all your stencils.
If you want to share this stencil with other users, you can add it to the gallery.
The current result was successfully added to the gallery.
![]()
This website showcases the approach for computer-assisted stencil creation from the paper "Multi-Layer Stencil Creation from Images"
published in Computers & Graphics, Volume 48 Issue C, May 2015; Authors: A. Jain, C. Chen, T. Thormählen, D. Metaxas and H.-P. Seidel
Home About Legal Notice Privacy Policy Contact Gallery
Copyright © 2012 - StencilCreator.org All rights reserved
Session ID: globalFileName=xxxxxxxx
Busy query: response
Function Params Passed (Preview):
Function Params Passed (Create Stencils):
File Upload Response:
AddPreviewImages Response (Success):
AddPreviewImages Response (Error):
Postponed images for content flow:

numOfLayers=3&baseColorLayer1&colorSelectMethod=FromImage&clusterQuery=true&filter=0&contrast=0&allColors=68,43,13;236,219,4;31,68,130;&mappingType=0&makeStencil=0&orderType=1&alpha=3&beta=15&pathWidth=10&simuIter=50&simuThresh=50&filterPara=50&simuType=0

numOfLayers=4&baseColorLayer3&colorSelectMethod=FromImage&clusterQuery=true&filter=0&contrast=3&allColors=30,18,5;250,246,1;0,30,157;0,2,116;&mappingType=0&makeStencil=0&orderType=1&alpha=3&beta=15&pathWidth=20&simuIter=50&simuThresh=50&filterPara=39&simuType=0

numOfLayers=2&baseColorLayer1&colorSelectMethod=Individual&clusterQuery=false&filter=0&contrast=2&allColors=255,255,255;0,0,0;&mappingType=0&makeStencil=0&orderType=1&alpha=3&beta=15&pathWidth=20&simuIter=50&simuThresh=50&filterPara=50&simuType=0

numOfLayers=3&baseColorLayer2&colorSelectMethod=FromImage&clusterQuery=true&filter=0&contrast=0&allColors=68,43,13;236,219,4;31,68,130;&mappingType=0&makeStencil=0&orderType=1&alpha=3&beta=15&pathWidth=10&simuIter=50&simuThresh=50&filterPara=50&simuType=0
Canvas Image upload Response(Success):
Canvas Image upload Response (Error):
Create Stencils Response (Success):
Create Stencils Response (Error):
Active Preset Response (Success):
Active Preset Response (Error):
Progressbar Response (Success):
Progressbar Response (Error):
Create Zip Response (Success):
Create Zip Response (Error):
Only Cluster Color (Success):
Only Cluster Color (Error):
How To Create A Stencil From A Photo
Source: https://stencilcreator.org/
Posted by: carterbougereb.blogspot.com
0 Response to "How To Create A Stencil From A Photo"
Post a Comment